Friday, 10 August 2018

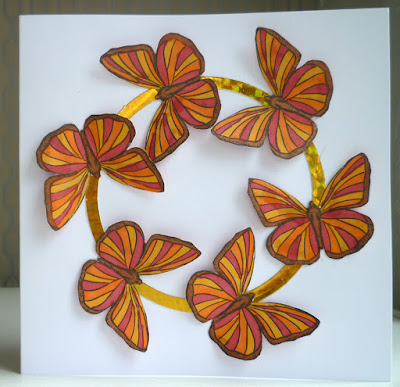
Ring a ring of butterflies


My original idea was to make a circle of butterflies but decided it looked rather over kill so went for a much simpler design. The butterfly stamp is from a Threaders set by Sheena Douglas for Crafter's Companion coloured with Promarkers and cut out bu hand.

The gold circle is cut in mirri card and was actually waste from a create a card die I made a while ago and forgot to post.
I used a white square base card, added the gold circle then simply stuck the butterflies around the circle evenly.

No sentiment as yet but think a small sentiment in the middle would finish nicely and it could be for birthday, mother;s dat or even thank you, will definitely be using this design again as it was super quick to create once I had the elemnets and I think is quite stunning in impact.


I would like to enter this card into the following challenges;-

I love promarkers - anything goes

crafty creations - anything goes

addicted to stamps and more - CAS

CAS on friday - butterflies

passion for promarkers - make it feminine

colour crazy challenge - anything goes

try it on tuesday - inspired by a song

Monday, 25 June 2018

My final housemouse and friends guest designer challenge


In the UK school is still several weeks away from breaking for the summer but in the home country of the House mouse and friends they are already thinking of the days they return back to school so that is the challenge this time around but as always there is an anything goes option so everyone can play along.

I love my garden but in the last couple of years mother nature has been my garden designer as we have  been concentrating on sorting my sons garden and then I had a shoulder injury that has meant I haven't been able to compete with mother nature and her love of dandelions in my garden is only too evident, so for me this house mouse stamp represents my garden in summer. 

I decided to use an embossing folder on my card which is simply embossed and tinted with aqua pens and silver guilding wax. My mouse I coloured with promarkers and then fussy cut him out before attaching to the image and adding some small dashed lines as on the stamp for his 'puff'.

I die cut the embossed image and simply added that to an card base that had been coloured with yellows distress inks so I'm dreaming of a warm summers day. The sentiment just sums up my card as ,much as I don't like all the work the dandelions cause me as Eyeore says weeds are flowers too its just that they aren't where you want them and they do add colour and wildlife too so they can't be all bad.

I finished the inside of my card with the original image stamped and coloured with water colour pens but somehow the mouse on the card front looks bigger.

I would like to thank Christine and the team at Housemouse for giving me the opportunity of being guest designer and wish whoever is the next guest designers well and hope they have just as much fun as I have had. Please pop over and join in the fun you never know what might happen it could be you.

Monday, 11 June 2018

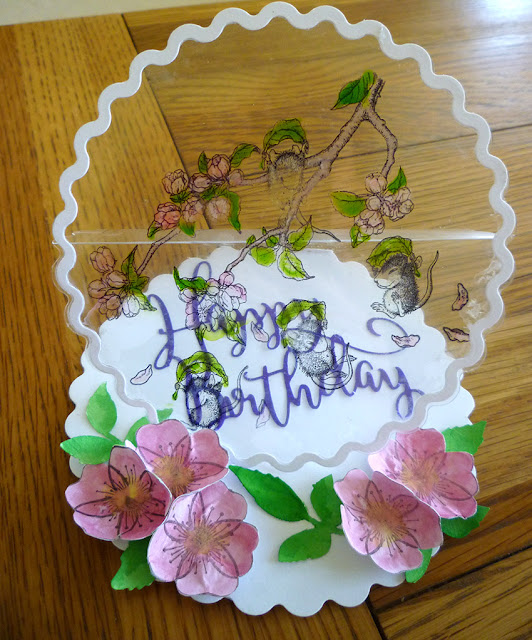
Floating in the air

Time for another House mouse and friends challenge and my penultimate guest designer card. I wanted to do something a little bit different and challenging for me anyway so here is what I came up with. 
I used a diesire create a card easel die to create my card but my challenge was to use acetate , well actually clear recycled packaging. I cut out the card pieces so I had a white card base and the bits for the easel were in acetate. I used the matting dies from the set to create a white bric- a -brac edging ti frame my finished image which of course for a house mouse challenge is some super cute mices.

I stamped the image onto the acetate using stazon and let it dry. I then used some water colour pens and mixed the ink with some pva glue on a piece of glass from an old picture frame for my mixing palliate and then painted my image from the back so the colours didn't obscure the printed image. I then left it to one side and crossed my fingers that when it dried it would have the effect I hoped for and thankfully it did.

I used pva glue to stick the acetate together and to the card and I love how it turned out. The sentiment is cut in purple mirri- card and the flowers are stamped and fussy cut before being shaped and stuck into position to hold up the easel.

Now I expect there will be lots of entries for this challenge as who doesn't make cards for birthdays and there is always the anything goes option if you are birthday card making filled so no excuses to pop along and join in.


Monday, 28 May 2018

Mousey die challenge


 I can't believe it's time for another challenge over at house mouse and friends challenge.

The challenge this time around is as always anything goes  and the optional theme this time is to use dies. 

When I make cards I like to try and make them with a recipient in mind and as I have quite a few family birthdays coming up it was easy to find inspiration.

I used this fun stamp of some cute wee mousey friends getting into the party spirit  and helping each other to a tipple  from the dregs of a martini glass.

I used a couple of dies on this card ,the first I used is a background die from memory box cut into pale blue centura pearl card I love this die as the die gives so much as you can use both the positive and the negative so no wastage.

I decided on a shaker card just to add to the party feel and used a couple of circle dies to create my window and frame before layering the dies and acetate to create the shaker and topping with the stamped image which once coloured I'd fussy cut.


Now I said there's no wastage with the background die so my sentiment inside the card shows just how that works and just finishes the look as its perfectly colour co-ordinated.
Hope you can all join in the fun mixing your dies with those super cute mices and can't wait to see what you all come up with.

Monday, 14 May 2018

Lots of pots

I can't believe how time flies by and this is already the time for another house mouse challenge guest designer card for me, its been such fun.

The challenge this time is flower power . I decided that this time I could use one of the few house mouse stamps I have, this cute mouse taking a rest beneath a daisy, my favourite flower. I always imagine he's taking respite from a blazing hot summer sun ,wishful thinking I guess but you can always dream of a red hot summer in the UK they do happen occasionally.

I decided to use a die to create my base card one I think is rather clever,well its several dies really as its a diesire create a card die. There are several different versions that can be  created but for my card I went with an open lace look in cream card.

The circle that is the central focal point of the card I used to place my image. I decided to create a stack of pots to add depth to the scene by stamping the pot part of my image 3 times and slotting the images into each other once coloured to crate the stack.

The images are all coloured with promarkers and spectrum noir alcohol markers and fussy cut out, I used pointalism technique to add a shadow around the images which just add a little more depth and also ground the scene I created too.

No sentiment as that can be added as appropriate to either the cut out design or to the reverse of the circle the image is on.

So hop along the the challenge and join in the fun.


Monday, 30 April 2018

If geeks are square how come they change the world?

Huge apologies to all at House mouse and friends for this not posting on time but I did think I had scheduled it but obviously I missed pressing a button and haven't been around to check as my son had been in hospital and on the day of his discharge I had a phone call to say I could have some surgery the following day on a cancellation that I had been waiting for so please forgive me and hopefully things will get back to normal now.

House mouse and friends Guest designer challenge 3 and for this challenge  I used another decoupage to create my version of 'Lets be square'.

When I was at school many moons ago those who did a lot of study or those who were just clever were called squares, I guess the interpretation was that they didn't know how to have fun, I suppose an updated version of 'square' is now known as 'geek' funny how names change with generations but really just mean exactly the same thing. I often wonder if those who do the name calling ever realise that the same peeps they called for being studious or clever are the ones that often go onto university and then get called names for being party animals or lay abouts' but later get well paid jobs and are often the innovators of changes to our world. If I were given the choice I think I'd like to be a clever square or geek.

Enough philosophising and onto my card. I used a white base card which of course had to be square. I created a background by doodling some mathematical equations ,alphabet and quotes that I dragged from the back of my brain and randomly added to the card.

I cut the image on a square of the decoupage paper and built up the layers so the cute studious mouse is truly the central focus of the card. 

I added one of the fun sentiments which I thought turned the card into a fun card for my neighbours daughter when she moves to secondary school in September(just got to put it somewhere safe till then).

Clean and simple but still fun and quirky.


Why not pop across to the House Mouse challenge blog and join in the fun yourselves, how will you interpret 'Let's be square'?


Monday, 16 April 2018

Guest designer challenge 2 for house mouse and friends

Welcome to my 2nd post as a HMAF guest designer hope you are all going to join in by popping across here.
The challenge this time is lets eat, and I chose to make the earliest festive card I think I have ever made using one of the CD images. I think these wee mice eating candy canes or as we would call them in the UK peppermint canes are so cute and as the weather here has been a mix of wintery and Spring it was easy to make on one of the dull and dreary days and believe it was a dull November .December day not early April when I made it.


I mounted the image on gold mirri-card for my focal image.

I decided to keep my colour palette simple and used a white base card dressed with some red patterned mirri-card offset against some embossed white centura pearl card embossed with snowflakes using a crafter's companion  3D embossing folder. 
I didn't add another sentiment as the canes the mice are eating
 spell the word JOY  so I didn't think it needed anything else.


Hope you'll all pop along to Housemouse and join in the fun


I'd like to enter this card into the following challenges:-

Fab n funky - cute critters

A bit more time to craft -anything goes


Saturday, 14 April 2018

A little floral sax

 
Water colouring pens don't have to be pale and washed out colours this card shows they can be big and bold too. I used another stamp from Donna Ratcliffe from Crafter's Companion and just love how the entwined flowers make the image unisex. I again used pebeo masking fluid to enable me to create the distress oxide background. I thought the dark blue really offset the bold pinks of the flowers and gold of the sax.


The faux bleach is so easy to do and satisfying in a strange kind of way as is the painting with the water colour pens. The flowers are also stamps from the same set and after fussy cutting I stuck them to the card overhanging the edge of the card before cutting flush with the card edges to form a semi frame. No sentiment but one could be added but love how it just makes a statement as it is.


I would like to enter this card into the following challenges;-

Stamping sensations - one for the girls

Allsorts - spring flowers or showers

AYLI - favourite colouring medium
(at present water colour pens and oxide inks are my medium
 of favour think mainly as I only recently bought
 them and am learning as I go)

MAWTT- springtime

The Paper Shelter - flowers

Addicted to stamps and more- make your mark


Flutterby time

I love this quirky stamp it makes me think of some time travelling sci-fi the name of which totally eludes me , but its somehow hypnotic. 
I am quite addicted to the masking and water-colouring technique as those who have been following my blog recently have no doubt surmised and these 2 cards are more of the same. That apart I love how different colouring can really change the look and feel of the image even though the focal image is really similar in colouring.

Both cards were created using the same technique, the central image stamped in stazon and then masked with pebeo masking fluid. The background was then created using distress oxide inks and faux bleaching using water and kitchen paper. the images were then cleared of masking fluid and painted with aquablend pens.

The cards were then matt and layered using purple mirri-card on white base cards and to say the only major colouring difference is the background I love how different the 2 cards look.


I would like to enter these cards into the following challenges:-

HLS watercolour -anything goes optional rainbow

Make my Monday - things with wings

Not just cards - anything goes

Crafty creations -anything goes

Penny's-  amything goes

Monday, 2 April 2018

House Mouse Challenge

I was lucky enough to be a winner at House Mouse challenge and part of the prize is to be guest designer for the next couple of months challenges. The first challenge is lots of images, now I don't have that many House mouse stamps but I do have a CD and a decoupage book so my GDT cards will be a mix of all 3 .The decoupage book I decided would fit the lots of images challenge perfectly but all my images are cut up to various parts and stacked on top of each other sandwiched together with little sticky pads.


I used my image to make an easel card using white card and more images to decorate the bottom layer but also create the stop for the easel part of the card.

Why not pop over to HMAF and play along


I would like to enter this card into the following challenges:-

just us girls- CAS

Pearly Sparkles - anything goes

A bit more time to craft - anything goes

A bit more time to craft Extra - anything goes


Saturday, 24 March 2018

hello clean and simple


I love Clean and Simple though I still feel as though I'm cheating a little . I made this card using Poppystamps dies simply cut in white as my focal image.

The background I made using my new glitter pens using 2 shades of green and a little glycerine it really gives a lovely finish ,it's just a pity the photos don't show the glittery sheen it gives. I used a faux bleaching technique to add a white sprinkling of dots for added textural interest.

I finished the card by mounting the layer onto a white base card.

I wold like to enter this card into the following challenges:-

poppystamps -  clean and simple

Penny's - anything goes

Scrappyland -anything goes

crafty friends -anything goes

QKR -anything goes

Tuesday, 6 March 2018

Mousey love


I recently made a purchase fro Jonna Sheene and had to choose a free gift so I chose some house mouse decoupage papers. I think this image is so cute and has many uses from Valentine's day to love you,anniversary or that you simply care about someone too.

I used a cream base card made with a die-sire create a card die. I decided to extend the image over the central circle so even when the card is open there is still some points of interest.

I finished the card by adding some blended distress oxide inks to give a rustic vintage aged feel to the base card.


I would like to enter this card into the following challenges;-

Crafty friends - springtime

Housemouse and friends - anything goes or bunnies

Dream valley - vintage

Daisy chain - Spring


Tuesday, 27 February 2018

Daisy golden swirl


I love daisies, had them for my wedding bouquet,and white ones are top of my list. I therefore love this die from memory box tilth.


I used a joy flourish die and cut it in gold mirri card to use as my base for my daisy.


The petal centres I removed from the outline and stuck them to the centre on the underside and curled the petal outlines upwards.

 I found some fab flower centres on amazon that work perfectly with the daisy.


I took a square base card and using peel offs created a frame.
I added the swirl flourish and daisy and card done.
I figured I could add a sentiment to the top right corner to fit the occasion I decide to use it for as I think it would be suitable for many occasions including birthdays ,anniversaries,get well, thank you or even sympathy.

I would like to enter this card into the following challenges:-

Unstampables -anything goes optional something new

AAA - CAS die cuts only

City crafter - die cuts only

Crafty cardmakers - floral delight

My time to craft - monochromatic


Pussy cat Love


Not a traditional Valentine's card but one I thought would make my son smile as he has a  cat who he loves and who runs rings around him too. I tried to colour my image to look like her though she is far prettier than this pussy who to me looks a little disgruntled with something, maybe wearing a heart around its neck.

The image is coloured with promarkers and I then masked the image whilst I used distress oxide inks to create the background.

The card is made using the outer circle die of an easel card Die-sire die set cut in yellow card. I finished the card with some small heart die cuts from poppy stamps again coloured with Promarkers.


I would like to enter this card into the following challenges;-

The corrosive challenge - anything goes

Addicted to stamps - have a heart

Daisy chain - add a heart

Make my Monday - messy background

Cards in envy - give it heart


Passion for Promarkers - cats and dogs

Sunday, 11 February 2018

Primrose wishes


A cute image from Aurora wings coloured with promarkers.


The papers are from my stash not sure of the brand as no longer have the packaging so few sheets left but works perfect with this image.


The card base is die-sire from Crafter's Companion as is the border die cut from white card.

The sentiment is a gold peel off .It's a light weight card that will be travelling to my mum-in-law in Tenerife.


I would like to enter this card into the following challenges;-

Aurora wings challenges - anything goes

Crafty creations - anything goes

613 Ave create - anything goes twist of love

Cards in envy - love you so much

crazy 4 challenges - love/appreciation/thinking of you

crafty catz - anything goes


Sunday, 4 February 2018

Pastel love hearts


 I found some dies on Amazon that were considerably cheaper as they aren't well know brand names so I thought I'd give them a try. They took a while to arrive but I think it was worth it as they cut really well and this one is so pretty. 


I decided to use both the positive and the negatives (the  out cuts) . I decided to keep the same shape as the die as I think its pleasing to the eye.

I firstly coloured a piece of card using distress inks in pinks  and purples and water to get a soft random effect. I then cut the the die. I then cut it a second time in plain white card.  


I used some centura pearlised white card cut into 2 A5 cards. I added the white die cut full circle to one card and then the coloured die cut atop so it was slightly raised from the base. 


The second card I again built using stacks but this time using the negatives but not for all the hearts. I used the die as a template to create the shape adding a couple of hearts to the sides.


I haven't added a sentiment as I think these cards would be great for Valentine's day, anniversary, engagement or even wedding or birthday but I do love how they turned out.

I would like to enter these designs into the following challenges:-

CASual Fridays - use hearts

HLS CAS - hearts

crazy 4 challenges - add a heart

Just us girls - love

A gem of a challenge - have a heart

craft rocket - love

MAWTT- love/valentines/wedding/engagement

naughty or nice- all loved up