Saturday 31 December 2016

For a cool couple

Another Christmas card again for a couple and again a mix of stamps and a die cut card base. I used stamps from see dee Victorian Christmas set and a super cute snowman couple from I think sugar nellie. All stamps were coloured with promarkers and then fussy cut and some sparkle added with stickles.


I again used the poppystamps dies of cottage base and fence dies and stuck them together  to form my card base. I love these dies as they make a card that providing you decorate thoughtfully can fold flat enough to post in an ordinary envelope.


I added the stamped images to the back of the base panel and added the holly and ivy images to the sides of the snow people.


The side fence panels I decorated with the stamped poinsettias and finished the card with a holiday sentiment die cut. I finished the card by adding a small stamped foliage accent to the sentiment.

I would like to enter this card into the following challenges:-

Creatalicious - anything goes optional happy new year /wishes

QKR -snowmen or snowflakes

Brown sugar - anything goes

polkadoodles -anything goes

creative knockouts -anything goes

4 crafty chicks -anything goes

aurora wings -winter wonderland


pop up bunny love

I know Christmas has gone and New Year is upon us and I wish all a very happy 2017 but I still have many Christmas cards I haven't posted but never mind I am sure there will be challenges through out the next year that they will be suitable to enter.


For this card I again used a mix of dies and stamps and also some promarkers to add some colour ,a bit of fussy cutting and some ink and embossing powders too. 

I used tree stamps from the dark room ,wiped them over with versamark ink and coated them in a mix of green glitter and snowflake embossing powder before fussy cutting them out.


I used a lily of the valley stamp which once stamped in black ,coloured with promarkers and again did a bit of fussy cutting on it. 
I die cut a holiday sentiment and a poppystamps cottage fence and base panels, well two fence panels one for each side and then I was ready to assemble.

I stuck the fence panels to the base and then added the trees to back panel both sides to add dimension and the side fence panels. I added the die cut sentiment to one of the trees at the front.

The image I added a strip of card to which I had formed into a hollow square so when the card is folded flat to go into the envelope it will lay flat but when opened allows the image to stand up.

Quite simple really and love how it can be posted as it folds flat and the recipients loved it too.

I would like to enter this card into the following challenges;-

the crafty addicts - anything goes/let it snow

simon says stamp -anything goes

I love promarkers-anything goes

craftaholics- Christmas cards or tags

that's crafty - anything goes

CRAFT - anything goes

crafty friends - anything goes

cute card thursday - anything goes

Saturday 24 December 2016

Share my scarf

I haven't been a very good blogger over the last year due to one thing and another  but I have so enjoyed making cards with a combination dies and stamps  and think I am slowly getting the hang of it.


I made some special cards for family , this one is for one of my nieces and her boyfriend  I hope she loves it as much as I loved making it.  I used a mixture of dies and stamps . The base is the fab poppystamps cottage garden base and gates , I just love how you can create a 3D card that folds flat in an envelope perfect when posting can cost so much these days.
I used this cute penguin stamp from I think sugar nellie I always get sugar nellie and lily of the valley stamps muddled as they both do such cute animal stamps. anyway these cute penguins are coloured with promarkers and some sparkle added with stickles. I then fussy cut them out and stuck them to the back fence of my card.


I completed the scene on my card by stamping this cute little conifer which was one of the first stamps I bought as I thought I could use it for guy cards, again I coloured with promarkers and fussy cut them out ,six in all. I added some gems in red and clear to look like fairy lights , well you have to have Christmas sparkle somewhere don't you?

I then added two to each side fence panel and one each side of my penguin couple. I completed the card with a die cut sentiment on the ground base of the card and done ready to fold flat and post.


I really love how it turned out.


I would  like to wish everyone a very merry Christmas and a happy and healthy 2017.

I would like to entr this card into the following challenges:-

Poppystamps challenges - oh Christmas tree

Inky chicks - Christmas cards in traditional colours

Unicorn -add some glitter

Passion for promarkers - use dies /punches


A gem of a challenge -anything Christmas

Alphabet challenge - use something red

Sunday 4 December 2016

Simple bauble wishes


I love the two memory box bauble  dies I have , I love how many different looks you can achieve  and dies are just a fun alternative to colouring when you want to craft but don't have the time to sit and colour .                                        For this card I used Lydia die and cut it twice one in plain mirri silver and once in a patterned mirri silver. I then made the bauble up by inlaying the cut out bits of the patterned mirri card into the plain mirri silver die cut. I love how effective it looks.

I used a white base card and also cut a memory box grand happy christmas die in white.
I used more plain silver mirri card behind the Christmas cut out letters and mounted this onto the white base card along the long edge of an A5 card. 

I could have attached the bauble either way using the card portrait or landscape but I decided to stick with landscape and placed my bauble towards the top right of the card. I really love how simple this card is but effective too.

I would like to enter this card into the following challenges:-

Outside the box  - metallics

613 Ave create - anything goes twist holiday happiness

come and get it - Christmas

IDIC - square or rectangle

Allsorts - CAS

Simon says Wednesday - anything goes


Ombre snowflakes

I struggle with pink but one my sons friends is pink mad so he wanted a card for her. Pink but not girly , his words not mine.

I decided to use a fiskers board and emboss some copy paper  and colour it with chalks from dark pink  to light pink in lines to give an ombre effect.

I think you can just about see the three different pinks.

I measured the paper against a white base card and cut it so I could have three panels across the card as my base layer.

I used a do crafts set to cut some snowflakes in silver mirri card and took 3 of different sizes and randomly placed them so they each overlapped two of the panels.

I finished the card using a die cut greeting from a Britannia word die again in silver mirri card.

I actually like how this pink card turned out, it's good to step out of your comfort zone once in a while.


I would like to enter this card into the following challenges:-


crafting with dragonflies -whatever the weather

the paper shelter - christmas card

AAA cards - CAS Christmas


fab n funky - Christmas

creative fingers - anything goes


Sunday 27 November 2016

Crisp and Clean


I love stamping but now I have a second love and addiction die cutting. I get the same buzz I get from die cutting as I do from heat embossing and bringing a stamped image to life when its coloured in.

Die cutting also gives you the ability to produce consistent images well sort of images, to produce multiple cards the same. Now ,I don't particularly like being the same as everyone so although very similar all my cards will be slightly different. 

I cut some poinsettia flowers  in white card  using a spellbinders die. I layered them and added 3 dots of liquid pearls for the stamens of the flower.

I used a bauble die from memorybox  and cut it in both plain silver mirri card and some silver glitter wall paper that I got  as a sample to wind my husband up that I was going to paper our living room in, he wasn't impressed, but its great for crafting as it doesn't shed. (It was from B and Q if any one wants to know).


I made two baubles (only using one on this card) and inlaid the plain mirri card into the spaces in the glitter card. I love white on white cards and in my book silver is just an extension of the white palatte. I think it might be my favourite colour scheme and not only for Christmas ,summer cards too as they just look so clean and crisp and elegant.


I finished my card by using a memory box stencil and embossing some white copy paper  and cutting to make a base for my bauble on a white base card. I completed with a Britannia die 'happy Christmas' cut again in plain silver mirri card.

I would like to enter this card into the following challenges:-

Jingle belles - dreaming of a white Christmas

As you like it - favourite Christmas colour and why
(White on white, clean and crisp like snow you don't have to go out in peaceful as it muffles sound and makes for an elegant card) 

Daisy chain challenges - all that glitters

Crafty girls creations - anything goes

Creative knockouts - Tis the Season

Cute card Thursday - tags,ornament or bauble

Time out challenges - Christmas with optional twist of glitter/shimmer

MAWTT - anything Christmas


Topiary Christmas


It seems like ages since I posted anything but now I am back and have cards lined up to share with you all.

For this card I used a lovely lily of the valley stamp , coloured with promarkers and then fussy cut before adhering to my white base card.

I never was any good at making fussy cards they always looked like someone had had an explosive regurgitation of craft items onto what I was trying to create , and similarly I struggled with clean and simple , although my cards were pretty plain. I am now finding clean and simple easier and no longer have to fight the urges of feeling I need to add more even though it does sometimes feel its cheating a little bit.

I  used one of my dies to emboss the edge of my base card, I love how doing something so simple can turn a plain base card into something that has a classy or elegant look.

I did think about adding a sentiment which would also have been a die cut but decided on reflection that it really didn't need it.


I would like to enter this card into the following challenges:-

Allsorts -  Christmas

The Pencil case - anything goes

Colour crazy challenge - anything goes 

Alphabet challenge - T for trees

Brown sugar- anything goes

CAS on Sunday - Christmas


Friday 28 October 2016

underwater crowning glory

I love aurora wings images, I'm not really into digital stamps but when I won some of these I just fell in love with Mitzi's images, have to say she can really draw faces which sadly many digital images seem to fail at doing,in my opinion anyway. I coloured this sea princess with promarkers and added some liquid pearls to her crown for a little added dimension and because it just felt they should be there.
I love how her hair just seems to be flowing in the water. I filled my area with colour and rounded the corners for a softer look.

I wanted to keep the image as the focus of my card so decided on a white square base card and instead of backing paper I decided to use some diecut flourishes for my backing of the image.

I cut them in some metallic card I have had for ages it has like an iridescent blue gold sheen and always reminds me of tropical seas well how I dream they would look never having been anywhere tropical. I added them to form a frame and randomly stuck some water drops to represent bubbles.

I know its not the best photo in the world but I guess you get the idea .

I would like to enter this card into the following challenges;-

Aurora wings - anything goes

crafty catz anything goes with a twist of use dies or punches

Polkadoodle -anything goes

daring card makers- sparkle and shine

cardz 4 galz - fairytale /fantasy

crafting with an attitude - always anything goes

crafty girls creations - always anything goes

perfectly created chaos - anything goes


Wednesday 19 October 2016

Watercolour wash birthday

In my family the birthdays and anniversaries are fairly clustered together, there are three groups really, one that runs from the end of July to the first week of September, a smaller group within 3 weeks of October and another cluster from the beginning of December through to 4th February.
If I were to buy cards which I don't there is never much choice during the winter months, I guess in the card industry they think people don't have birthdays during the months leading up to Christmas, and as shops start Christmas earlier and earlier need I say more.


I tried to play with some distress inks and have a go at a water colour wash and make a warm graduated effect, mainly as they are my mums colours, she love autumn.

I also used the memory box chrysanthemum die  corner  as mum also loves the flower.I cut 2 in gold mirri card and placed in the corners of my painted card.

I added a gold mirri card butterfly in the centre and a sprinkling of gold sequins.

I cheated with the sentiments and used peel-off stickers in gold in the corners to balance the card. Hope mum likes it.


I would like to enter this card into the following challenges:-


Animal friends -halloween/autumn
(hope a butterfly counts for an animal)


HLS - anything goes with dies

fab n funky - fabulous flowers

create and makes - anything goes optional use a die


Monday 10 October 2016

Memory box art deco roses birthday wishes

I always think it must have been a bit of a magical era especially where fashion was concerned in making the girls and ladies who wore it feel so glamorous ,elegant and girly, how times and fashion changes, although certain elements do seem to reappear all be it tweaked for re-invention.   I do love the idea of the glam dresses and hats but I also think the languid fashions called for long lanky stick insect bodies, something I most definitely have never had and no amount of dieting will ever aid me to achieve and be healthy either lol.
My niece must also share this love of the the period and fashion as she buys many cards with the elegant ladies adorning the fronts. She has a birthday soon so I had a rumage through my stash to see what I could come up with and saw this fab memory box corner die which I thought would be perfect.


Mackintosh roses in abundance I cut them in black glossy card and backed them with red mirri card. I cut 4 and formed a frame on a white base square card.

The central image and alphabet stamps are from the stamp man aspects of design and are among some of my first bought rubber stamps. I stamped in black versafine and fussy cut them all out. I finished my lady with some liquid enamel earings and promarker red lipstick.

Quite a simple design but I think quite striking too.


I would like to enter this card into the following challenges:-


simply create too - black white and one other colour

creatalicious - anything goes optional celebrate

cards in envy - frame it

always using rubber - it's not all black and white

morgans art world -anything goes

that's crafty - all of a sparkle


Wednesday 5 October 2016

Bullrush birthday

My in laws live in Tenerife and birthday cards are apparently very hard to come by and if you do find them they are extremely expensive. There is quite a big group of ex-pats many in their silver years and the only cards that don't fall into the really expensive group are those from the church shop which after receiving some tend to be made from recycled bits from bought cards and the insides of envelopes. There is one craft shop in Los Cristianos where they live but obviously there is no one in their circle who is a crafter with the money to spend on local supplies.

My mum in law is always saying to me that I could make a fortune selling cards. I don't think they charge much for the cards they have in the church shop and they give the money raised to charity , so I don't want to take money from that but my mum in law said they are desperate for cards for guys and anniversary cards but they have to be light weight for posting.                                                                               I put my thinking cap on and came up with these for starters. I used memory box cattails die and cut them out in mirri card , gold and bronze. I also cut them out on a white piece of card that I would use for my card layering matt.  I used moon-glow spritz sprays to colour the matting layer before in laying the metallic cattail die cut. 
I added a colour matt under the spritzed layer on a 240gsm card base trying to keep the weight down. I cut a 'happy birthday' sentiment using a Britannia die in co-coordinating metallic card to match the colour matt layer on each card and hopefully these will go down well.
I have made a few other cards to send to Tenerife for them to sell hopefully they will make a little more money for charity and if they go down well make enough to pay for me posting them out there too. I have tried to get my mum in law into card making but its just not her cup of tea so hopefully this will help. 

I would like to enter these cards into the following challenges;-


Noor design uk - CAS or fully loaded

Card mania - Sparkles and bling

the Male room - leaves and or trees
(A cattail definitely has leaves hope they count)

crafty cardmakers - birthdays

whoopsi daisy - die cuts and punches

613 Ave create - anything goes optional green and gold


Tuesday 4 October 2016

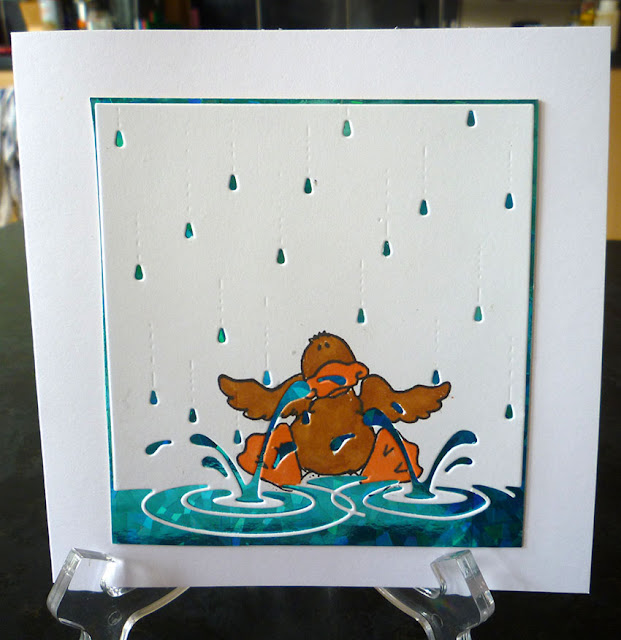
Nice weather for...

...ducks!


I love this cute 'Dunno duck' from High hopes he just makes me smile and when I found this die background (although I just bought it as I thought it was fun and hadn't any idea how I would use it) and rediscovered this little fella I knew they just had to get together.                                                                               I first cut the die out and embossed it on white card , I love how the embossing gives the detail on the raindrop tracks.                                                                                                                          I then stamped my duck so he appeared to be sitting in the puddles and coloured him with promarkers.


I used some blue metallic pattered card to back the die cut extending the length to form a square and making the water appear shallow like a huge puddle. It also coloured the splashes and the rain drops.
It does look a little odd if you look closely as the perspective is obviously wrong as the duck is a layer above the blue but from any kinda distance it gives the appearance of a duck having a splash in a puddle during a rain shower.


I think it would be the perfect card to make someone smile be it as a get well, just because or even a birthday like a milestone that we are all suppose to dread reaching lol. 

I would like to enter this card in to the following challenges:-


shopping our stash - duck,duck,goose

the paper girls - splish splosh

IDIC - square cards

(I think my rain trails look like stitching)


crafty catz - birds of a feather

QKR -cut it up

stempelsonne -anything goes

MFP - birds CAS


CAS christmas wishes


I wouldn't normally start making my Christmas cards yet as I prefer to make them when the weather has started to get that crispy nip of winter and I so cling to the idea that is summer even if I don't feel like we have had a real summer yet, but I live in hope lol.


I used a docrafts xcut snowflake and cut it out in silver mirri-card and also pale blue pearlised card and overlaid one on the other but slightly off-set.


I used the same pale blue card as a backing for the happy Christmas die from memory box, a quick and easy card to put together but I think has a clean crisp winter day feel.

I would like to enter this card into the following challenges:-


ABC challenge - Q is for quick

Brown sugar - anything goes

Polkadoodles - anything goes

Auds sentiments - anything goes


craft your passion - anything goes

crafting from the heart - anything goes

Monday 3 October 2016

pink and girly

I struggle with pink and overly loaded or fussy cards so this is a problem when I need a pink and girly card. I was having a rummage looking for inspiration and found this printed decoupage set which I thought might fit the bill for my sister in laws 40th birthday later this month.


I added some extra sparkle with stickles to both the shoes and bag and the background. 
The background paper is fro birdhouse free printables and the butterfly was recycled from a card my mum received.She pulls any bits off bought cards she thinks I may be able to use, and the colours of it were perfect.

The sentiment is left over from a kanban kit from qvc years ago.

Just got to remember to post it on time now.

I would like to enter this card into the following challenges;-

Crafty friends - special occasion

The crafter's cafe -use lots of pink

Crafts galore encore -anything goes


MFP - anything goes


Alphabet challenge - P is for pink

In the pink - flower power


Friday 23 September 2016

Autumnal thank you


I love my dies and am learning all the time there are just so many possibilities.

I decided to use them to make a thank you card for my son before he asks for one last minute as he will want one for hospital staff when he has day surgery next week.

I decided to have a play with spritz inks and waterspritz too. I used them with the negative from the leaves die cut ,my makeshift stencil. You can just make out the shape beneath my die cut leaves.

I used the leaves from leaf collage ,they are such fun as with their stitching which I cut from white and kraft card, The white I used distress inks to colour the kraft I left naked. I randomly placed them on my spritzed layer from which I had cut a majestic maple leaf from. All dies are memory box or poppystamps as these make up the majority of my collection so far  and they are just fab.

I coloured a scrap of card with bright blue as I love the bright clear skies that alternate with the dull cloudy ones of autumn. I decided to make a shaker card so used some of the smaller die cut leaves from the collage die but this time cut in metallic card as when the sun shines they seem to shine.

I added a small 'thank you' peel-off sticker to the front of the acetate .

I finished the card by adding a gold mirri matt to link to the mirri leaves in the shaker.


I would like to enter this card into the following challenges;-

Auds sentiments -fall colours

MFP -stencils and sprays

Cards in envy - hello fall

Stampavie and more - autumn colours

CRAFT - autumn/halloween/thanks giving

4 crafty chicks - colours of fall

Art impressions - cards to die for

Tuesday 20 September 2016

Poppy stamps park

I saw a card made by Olga (told you she makes beautiful and inspiring cards) here and I decided to treat myself to some of the dies she used. Only some as all the retailers I use who have reasonable prices were out of stock for many of them. I know my card is nothing like Olga's beautiful card and in no way as beautiful but thought it would make a fun card for my brother's up coming birthday.

He is and has always been cycling mad, could ride a bike before he could walk and even went out cycling on Christmas day every year when I was still at home not sure what he does now he's married but I suspect he still does. 

I decided to make my poppy stamps cottage fence card into a park and used these memory box Alessandria die cut trees.  I should say I embossed the floor of the card using a sizzix wall embossing folder before sticking the side panels to the main body. The trees I stuck them to card after die cutting, to strengthen them I added more card and cut around them . I hind sight I think I would have been better off separating all the pieces and colouring them first as this wasn't easy once they were all stuck together so please don't look too closely as I made a mess in a couple of places. I used my favourite colouring medium promarkers to add the colour.


I added some die cut birds again from poppystamps and again coloured with promarkers.


I used a mix of punches and foliage dies to cut my hedge and added some flowers again from a punch and stuck them to the fence panels.

The cycle is from Memory box and is actually a girly cycle. I experimented and cut one of the two bars and found I could lift it and make a boys cycle,not exactly a racer but you can't have everything.

I coloured the cycle again with promarkers including some metallic ones it really has a lovely shine but my photos unfortunately don't show this. I stuck to the fence overhanging the centre to draw the eye to the centre but also to give the idea of it being rested against the fence.


I finished the card by rubbing cocoa memento ink along the stones and added a die cut sentiment from Britannia dies in dark green.


Overall I love how this card stands and its just a little different. You may ask why a park setting, thought it might wind my baby brother up a little if it jogs his memory, as he took one of his girlfriends cycling to the park and he needed the toilet. His girlfriend said she didn't need to go so he left her outside with the cycles. His girlfriend changed her mind and instead of waiting till he came out went in at the same time leaving the cycles (both my brothers and mine that he had borrowed for her )and guess what mine was stolen. The relationship didn't last long as she really felt it wasn't her fault ,didn't offer to replace the cycle and complained that she had to walk home as he wouldn't call and pay for a taxi as the park wasn't on a bus route.

Not that I hold any grudges but well he is my brother and I don't get to torment as much now he is in another part of the country, and if it doesn't jog his memory well its a nice setting for a cycle ride.

Best thing about this card it fits flat in an ordinary envelope.


I would like to enter this card into the following challenges:-


Little red wagon - be a good sport

crafting when we can - use favourite colouring medium

get creative - use embossing

craft your passionn - anything goes

crafting from the heart - anything goes

OSAAT - special day